
Follow simple actions proposed by
cleaning services bedford on how to clean floors with pets. Transform your flooring from grimy and boring to gleaming, gorgeous and clean!
Initial Things First-Determine the final
Before you grab a bucket of water and a mop, you need to learn how your hardwood floor is sealed-if at almost all. Why? The final, not the wood kind, determines the method that you clean and look after the floor.
Surface-sealed floors: Most fresh wood floors are usually sealed with urethane, polyacrylic or polyurethane. Surface-sealed floors are usually stain and water-damage resistant and least difficult to look after and clear: Sweep, mop and you're done!
Penetrating-seal-treated and oil-handled floors: Also common, a penetrating seal or essential oil finish soaks in to the solid wood hardens and grain. This kind of floor should be protected and pampered with liquid or paste wax.
Lacquered, varnished, shellacked and untreated flooring: Although technically surface area finishes, lacquers, shellacs and varnishes aren't as proof to moisture, wear and spills because the other sealants mentioned. Treat floors with one of these finishes and floors without finish as you'll penetrating-seal-treated and oil-treated flooring.
Not sure what type of finish you have that is not harmful for pets? To inform the distinction in a pinch, rub your finger over the floor just. If no smudge seems, the ground is surface sealed. In case a smudge is created by you, the ground has been handled with a penetrating seal, essential oil finish, shellac, lacquer or varnish, and then waxed.
Cleaning Surface-Sealed Floors
Product Do's and Don'ts
Don't use oils, furniture or waxes sprays. Oil results in a residue, furnishings spray creates a slippery surface area (think ice-skating rink!) and wax does take time to use and makes recoating (observe Tackling Simple Wood Ground Problems) difficult.
Avoid straight ammonia, alkaline items or abrasive cleaners. They'll boring or scratch the final.
Do work with a floor-cleaning item recommended by the ground finisher or choose plain soap and drinking water. If the recommended item is difficult to find or expensive, and other ground cleaners contain things that violate your floor's warranty, try water and soap. I put in a quarter mug of moderate or pH-neutral soap (like liquid dishwashing soap) or Murphy Essential oil Soap (regardless of the name, it generally does not contain essential oil) to a bucket of drinking water.
Don't depend on water alone or perhaps a vinegar and drinking water treatment for clean hardwood flooring. Mopping with water can lead to dingy-looking flooring and won't-budge dust buildup. Vinegar and drinking water is not as effectual as soapy drinking water and-some suggest-may dull flooring sooner. (Eventual dullness and the necessity to recoat are unavoidable no matter what you utilize. See Tackling Simple Solid wood Floor Problems.)
Routine Cleaning
In high-traffic areas, just like the dining kitchen and room, you should daily sweep, if possible, and mop a few times a week. Mop less-trafficked areas monthly or once a time of year.
Mopping Technique
Remember: Drinking water is wood's worst type of enemy (still on sealed floors!), so work with a damp mop rather than soaking wet one.
Dip the mop in to the bucket of ready cleaning answer, wring it out completely, mop in direction of the solid wood grain and repeat. When the water dirty gets, empty the bucket, blend a fresh batch of cleaning answer and continue mopping.
When finished, return back on the entire surface with thoroughly clean water to rinse.
Don't be scared to get on your own fingers and knees if required. Whenever a floor needs severe attention, I clear it with a fabric. (It's much better than a sponge as you can "feel" the dust as you wipe!)
Tackling Simple Solid wood Floor Problems
Scuff marks getting you straight down? A little bit of baking soda on a damp sponge shall erase them.
A stubborn food noticed, water or grease stain on your own surface-sealed floor? Work with a commercial cleaner to take care of this problem always.
Hairline cracks inside the ground? Don't panic and try to fill them. Dry out heat during the winter season causes wood flooring to shrink and crack. Cracks should up close through the summer (though utilizing a humidifier may also help).
Finish looking dull? Sand the ground lightly and recoat having an additional coating or two. Recoating is essential about every five to seven yrs.
Cleaning Penetrating-Seal-Treated, Oil-Treated, Shellacked, Varnished, Untreated or lacquered Floors
Item Do's and Don'ts
Carry out use stripper to eliminate old wax buildup. Select a product the ground manufacturer recommends, an industrial product from the equipment shop or mineral spirits.
Carry out use liquid wax created for wood flooring or paste wax. Liquid wax is simpler to apply but results in a thinner coat (and less safety) than paste wax.
Avoid acrylic or water-centered waxes, furnishings waxes or one-stage waxes. Acrylic and water-centered waxes can change floors white, furnishings wax creates a slick surface area and one-step waxes (regardless of the compelling pitches: They clear! They remove aged wax! They lay out fresh wax!) can trap dust.
Routine Cleaning
USUALLY DO NOT damp-mop waxed flooring. Just vacuum cleaner and regularly sweep the top. Once or twice per year, strip the aged wax and use a brand new coat. In case a high-traffic region gets dull among treatments, it is possible to spot-wax the certain area.
Waxing Technique
Vacuum the ground to remove dust.
Strip the old wax with stripper (following a manufacturer's guidelines) or mineral spirits (rub into wood and clean off with a new clean, soft cloth). Keep carefully the certain area well ventilated as you work so when the floor dries.
Following the floor has dried, use a thin coat of wax, utilizing an applicator (if you are using liquid wax) or perhaps a cloth (if you are using paste wax). Allow wax dried out. For added safety, apply another coat of wax.
Finally, buff. Work with a cloth or, to help make the working job easier, rent a buffing device. Be sure you always buff in direction of the wood grain.
Tackling Simple Solid wood Floor Problems
Whitened water spots marring your floor's finish? Add a little bit of mineral spirits to an extra-fine metal wool pad and softly rub the region in a circular movement. Keep the area nicely ventilated as you function.
Got back heel marks that will not wipe off? Add a little bit of wax to an extra-fine metal wool pad and softly rub the region in a circular movement.
Food stains causing trouble? Wipe the top with a damp fabric, rub dried out and wax. When eliminating any stain (from solid wood or carpet), always function from the outside advantage in toward the guts.
Tips for Preserving Hardwood Floors: 3 Must-Follow Rules
To extend the full life of one's hardwood floor no real matter what the finish, bear in mind these three simple guidelines:
Vacuum or sweep often. Ground-in dust destroys wood flooring. To avoid buildup, clean floors a few times each day in high-traffic areas, like the dining and kitchen room. No time? Lessen sweeping time by putting a doormat at each entry to your house.
Wipe upward mud and instantly spills. Wood is very easily damaged by water.
Choose carpeting wisely. In the event that you try to protect your solid wood ground with a rug, be mindful. Rug dyes have already been recognized to stain floors, and plastic material backings may impact the wood finish. Ask the carpet shop to recommend an underpad as a safeguard.
 After that, you'll need to calculate and mark the area where you'll be erecting your fence. One of the most critical questions you'll have to answer is whether the area where you intend to build your sturdy farm fence is subject to any easements.
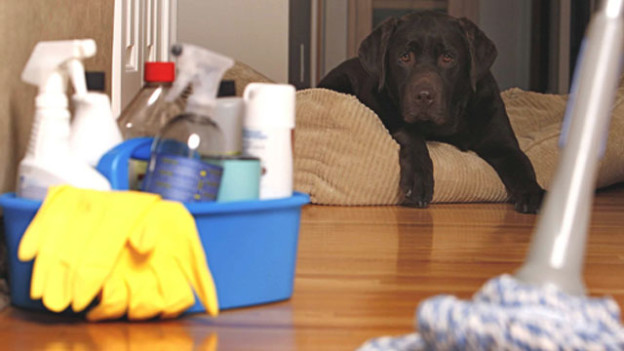 Clearing up Pet Hair


 If you would like great curb appeal, a refined turn to your landscaping, and dollar for dollar increased worth for the home, then you’re likely to like these mulch landscaping suggestions to give a polished contact to your trees, shrubs, and beds. While mulching is essential because of its aesthetic appeal, it is a necessity for the ongoing health of your plantings, as well.
 Most store-purchased cleaners contain chemicals that may cause not eye and pores and skin irritations but even malignancy just, birth and asthma defects. They could be ingested by children and pets accidentally.